Select an Action in Advanced Search Results (enGB)
The Select an Action drop-down menu in XactAnalysis® Advanced Search Results allows you to complete various tasks for multiple assignments simultaneously. Many options in the Select an Action menu appear based on preferences and user rights.
The screen shots in this document are generic, and your company’s interface may vary.
Related: Statuses, Advanced Search, Column Admin, Assignment Detail
Use the Select an Action menu
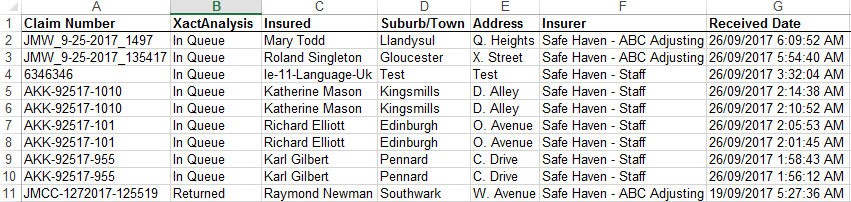
- Go to Advanced Search and complete a search. If more than one assignment matches your search criteria, the Advanced Search Results page appears.
- Select the check boxes for the assignments you want to modify.
- Click the Select an Action menu and select an action.
- Click Go.

Complete an action
This section provides detailed instructions about every available option in the Select an Action menu found in Advanced Search Results.
Actions marked with an asterisk (*) are preferences and can be enabled for your company by calling your product specialist or account manager.
Export All to Excel*
When you select this option, all of your results are exported to an Excel spreadsheet. This option is not available for read-only users.
Export Selected to Excel*
Export selected rows of your search results to an Excel spreadsheet. This option is not available for read-only users.
- Select the check boxes for the results you want to export.
- Click the Select an Action menu and select Export Selected to Excel.
- Save the Excel file to your computer when the download is complete. Open the file to view your search results.
Download All Details to Excel*
When you select this option, all of your results are exported to an Excel spreadsheet. This option is not available for read-only users. This option differs from Export All to Excel in that the columns in the exported file are pre-defined and unchangeable.
Download Details to Excel*
Download the details of selected assignments to an Excel spreadsheet. This option differs from Export Selected to Excel in that the columns in the exported file are pre-defined and unchangeable.
Mark Read/Unread
Mark selected assignments in the list as either Read (normal text) or Unread (bold text).
Assign*
Assign selected assignments to an adjuster or contractor, or data set. This option is not available for read-only users.
- Select the check boxes for the assignments you want to assign.
- Click the Select an Action menu and select Assign.
- Click Go. The Assign dialogue box appears from which you assign an adjuster or contractor, or data set.
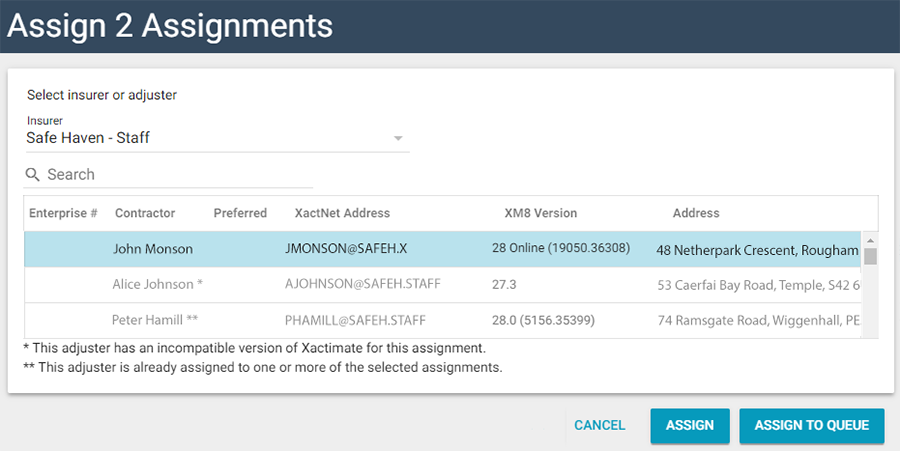
Assign an adjuster or contractor
- Select a data set from the Data Set menu. The list automatically updates to display the qualified adjusters/contractors in that data set.
- Type a name, XactNet address, Xactimate version, or address in the Search field to automatically filter the list by your criteria.
- Click a name in the list.
- Click Assign.
Assign a data set
- Select a data set from the Data Set menu.
- Click Assign to Queue. The assignments are moved to the Assignment Queue of the selected data set.
Reassign*
Reassign selected assignments to a different adjuster/contractor or data set from Advanced Search Results. You may select only assignments that have already been assigned. Assignments with the status of In Queue may not be reassigned. You cannot select multiple assignments to be reassigned from Advanced Search Results if they are not from the same client group. This option is not available for read-only users.
- Select the check boxes for the assignments you want to reassign.
- Click the Select an Action menu and select Reassign.
- Click Go. The Reassign dialogue box appears.

Reassign an adjuster or contractor
- Select a data set from the Data Set menu. The list automatically updates to display the qualified adjusters/contractors in that data set.
- Type a name, XactNet address, Xactimate version, or address in the Search field to automatically filter the list by your criteria.
- Click a name in the list.
- Click Assign.
Reassign the data set
- Select a data set from the Data Set menu.
- Click Assign to Queue. The assignments are moved to the Assignment Queue of the selected data set.
Resend*
Resend the selected assignments to an adjuster or contractor. Select the specific version of the assignments you want to resend (if there are multiple versions). You may need to resend an assignment for various reasons: The adjuster or contractor may have rejected or deleted the assignment and need it again, or the adjuster or contractor may not have received the assignment the first time it was sent. This option is not available for read-only users.
- Select the check boxes for the assignments you want to resend.
- Click the Select an Action menu and select Resend.
- Click Go. A confirmation dialogue box appears.
- Click OK. A dialogue box informs you that the assignment was successfully resent.
- Click OK.
Resend Original*
Resend the original version of the selected assignments to an adjuster or contractor. This option is not available for read-only users.
- Select the check boxes for the assignments you want to resend as the original.
- Click the Select an Action drop-down menu and select Resend Original.
- Click Go.
- A confirmation dialogue box appears. Click OK. A dialogue box informs you that the assignment was successfully resent.
- Click OK.
Assign Desk Adjuster*
Assign desk adjusters to selected assignments. This option appears for users with the Desk Adjuster Administrator application right. Add this right in User Administration. This option is not available for read-only users.
- Select the check boxes for the assignments you want assign.
- Click the Select an Action menu and select Assign Desk Adjuster.
- Click Go. The desk adjuster search dialogue box appears.
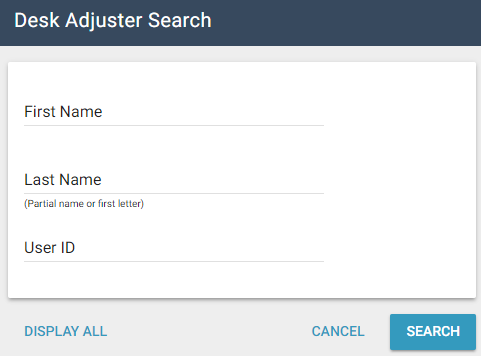
- Click Display All to view all the desk adjuster’s names, click a letter to search alphabetically, or use the search fields to search by first name, last name, or user ID and click Submit.
- Select the name of the desk adjuster to assign, and wait for the page to refresh. The desk adjuster's name appears in the Desk Adjuster column.
Reassign Desk Adjuster*
Reassign desk adjusters (assign the assignment to another desk adjuster) on the selected assignments. This option appears for users with the Desk Adjuster Administrator application right. Add this right to users in User Administration. This option is not available for read-only users.
- Select the check boxes for the assignments you want to reassign.
- Click the Select an Action drop-down menu and select Reassign Desk Adjuster.
- Click Go. The desk adjuster search dialogue box appears.
- Click Display All to view all the desk adjusters' names, click a letter to search alphabetically, or use the search fields to search by first name, last name, or user ID and click Submit.
- Select the name of the desk adjuster you wish to assign, and wait for the page to refresh. The desk adjuster's name appears in the Desk Adjuster column.
Remove Desk Adjuster*
Remove desk adjusters from selected assignments. This option appears for users with the Desk Adjuster Administrator application right. Add this right in User Administration. This option is not available for read-only users.
- Select the check boxes for the assignments you want to modify.
- Click the Select an Action drop-down menu and select Remove Desk Adjuster.
- Click Go. The desk adjuster is unassigned and their name is removed from the Desk Adjuster column in Advanced Search Results.
Assign Collaborator*
In Advanced Search Results, collaboration administrators can assign one or more returned estimates to a collaborator. For more information, see Estimate Collaboration. This option is not available for read-only users.
- Select the check boxes next to the estimates you want to send for collaboration.
- Click the Select an Action drop-down menu and select Assign Collaborator.
- Click Go. The Selected Assignments dialogue box appears with the assignment IDs of the estimates you have chosen.
- Select a reason for the collaboration.
- Click the Claim Rep SmartList button to search for a collaborator.
- Select a collaborator from the list. The collaborator’s name appears in the Claim Rep field of the Selected Assignments dialogue box.
- Click Submit. When each estimate is assigned, the assignment ID changes to green and Assigned Collaboration appears to the right of it.
- You are notified when XactAnalysis is done assigning collaborations. Click Close.
Map Assignments
View selected assignments with Google Maps. This option appears for all users.
- Select the check boxes for the assignments you want to map.
- Click the Select an Action menu and select Map Assignments.
- Click Go. A map appears that marks the selected assignments. Zoom in on an assignment's marker and select it to view assignment details.
Edit CAT Code*
Edit the CAT Code of selected assignments. This option is not available for read-only users.
- Select the check boxes for the assignments you want to edit.
- Click the Select an Action menu and select Edit CAT Code.
- Click Go. The Edit CAT Code dialogue box appears.
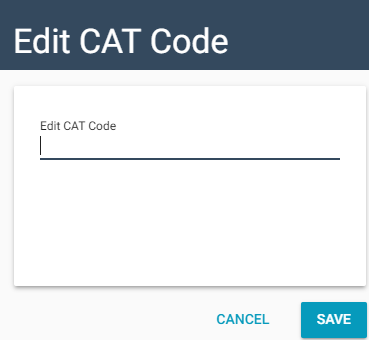
- Type the CAT code in the field and click Save. A confirmation dialogue box appears, and the CAT code appears in the CAT Code column in Advanced Search Results.
Export to [Third Party Company]*
Send assignment information to a third-party company of your choice for selected assignments. For this option to appear, you must have an account with the third-party company and a data set you have rights to must be set up by XactAnalysis to use the third party company export. This option is not available for read-only users.
- Select the check boxes for the assignments you want to export to a third party company.
- Click the Select an Action menu and select Export to [Third Party Company].
- Click Go. A confirmation dialogue box appears.
- Click OK. The assignments are exported to the company. A notification dialogue box appears.
- Click OK.
Show Distance from an Assignment*
Sort your Advanced Search Results by distance from a specific assignment. This option is available for all users.
- Select the check box of the assignment that is to be your starting point.
- Click the Select an Action drop-down menu and select Show Distance from an Assignment.
- Click Go. XactAnalysis calculates the distance of the remainder of the assignments from that starting point. The distance is shown in the Distance column in Advanced Search Results.
Clear Distances*
Reset your Advanced Search Results after using the Show Distance from Assignment action. This is only displayed when the user has selected Show Distance from an Assignment.
- Click the Select an Action drop-down menu and select Clear Distances.
- Click Go. The page will refresh.
Assign Reviewer*
Assign a reviewer to selected assignments from Advanced Search Results. This preassigns who the reviewer will be once the assignments enters the Estimate Review Queue. This option appears for users with the Estimate Review Administrator right and the rights to any data set with this option. This option is not available for read-only users.
- Select the check boxes for the assignments you want to assign.
- Click the Select an Action menu and select Assign Reviewer. The Select a Reviewer menu appears.

- Select a reviewer from the list and click Go. The Assign Reviewer dialogue box appears.
- Verify that the name is correct and click Assign Reviewer. The page will refresh. The reviewer’s name appears in the Reviewer column in Advanced Search Results.
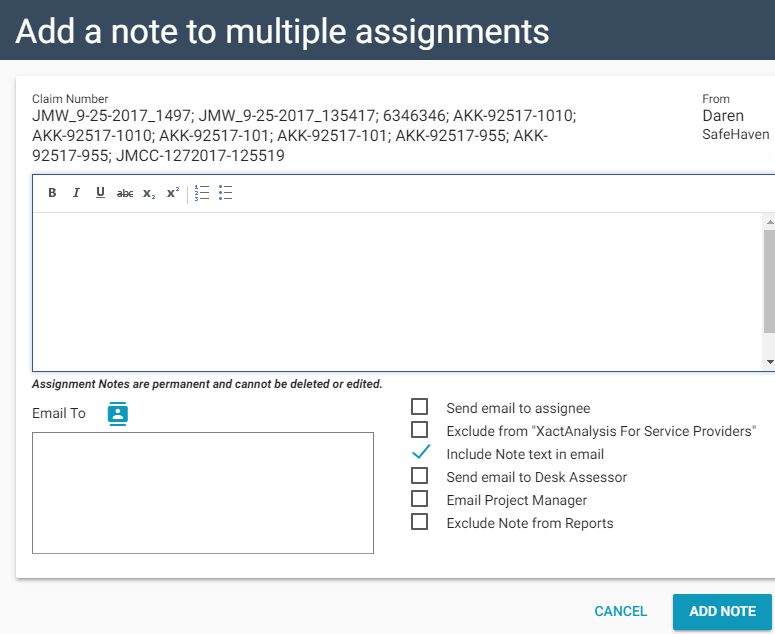
Add Note*
You can add a note to one or more selected assignments. This option is not available for read-only users.
- Select the check boxes for the assignments to which you want to add a note.
- Click the Select an Action drop-down menu and select Add Note.
- Click Go. The page will refresh. The Add A Note dialogue box appears.
- Type the note in the Note field and select from the options.
- Click Add Note. The note is added to the selected assignments and a note count appears in the Advanced Search Results.
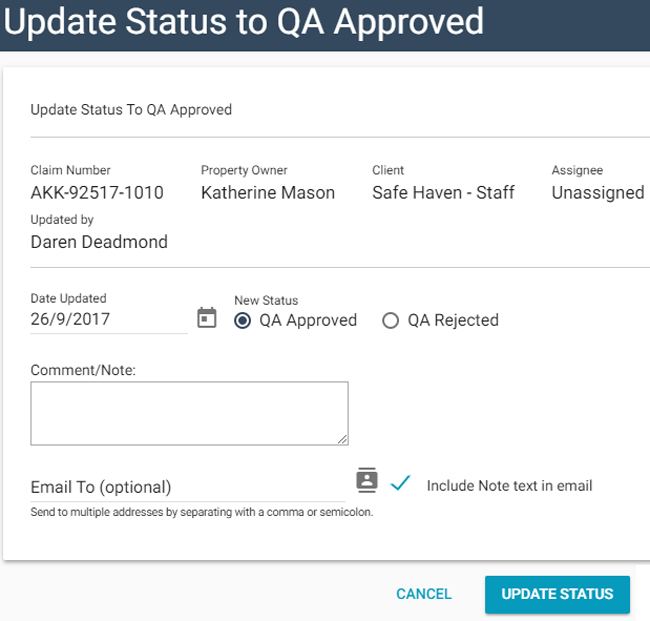
QA Approve*
Update the QA Approval status of selected assignments to QA Approved. This option is not available for read-only users.
- Select the check boxes for the assignments you want to update to QA Approved.
- Click the Select an Action menu and select QA Approve.
- Fill out the form and click Update Status.
- Click Go. The Update Status to QA Approved dialogue box appears. The assignments that will be updated are listed at the top of the window. Any assignments that cannot be updated are listed below with a reason why.
- Fill out the form and click Update Status.
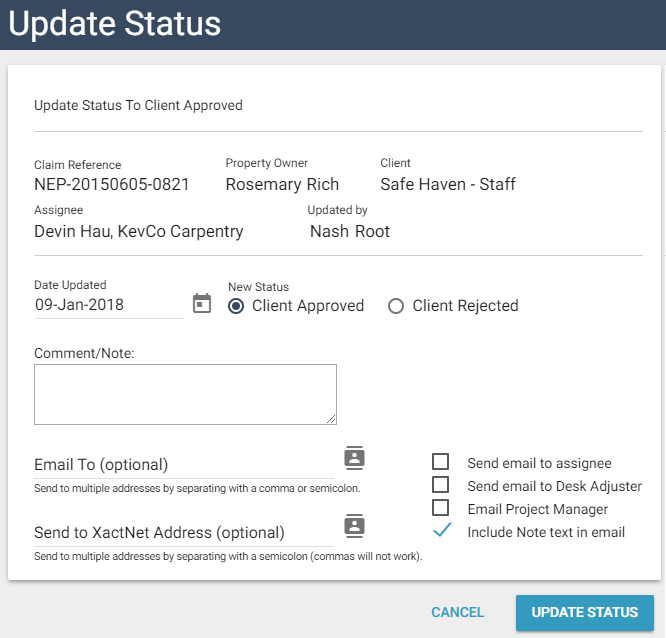
Client Approve*
Update the status of selected assignments to Client Approved. This option is not available for read-only users.
- Select the check boxes for the assignments you want to update to Client Approved.
- Click the Select an Action menu and select Client Approve.
- Click Go. The Update Status to Client Approved dialogue box appears.
- Fill out the form and click Update Status. The page refreshes, and the assignment's approval status is updated.
- Click Go. The Update Status to Client Approved dialogue box appears. The assignments that will be updated are listed at the top of the window. Any assignments that cannot be updated are listed below with a reason why.
- Fill out the form and click Update Status.
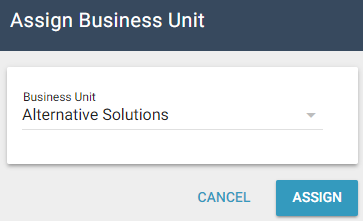
Assign/Reassign Business Unit*
This preference allows you to assign or reassign business units to assignments. The Business Unit portion of the name and the list of business units can be configured for your company.
- Select the check boxes for the assignments to which you want to assign or reassign a business unit.
- Click the Select an Action drop-down menu and select Assign/Reassign Business Unit.
- Click Go. The Assign Business Unit dialogue box appears.
- Select a business unit and click Save.
- Refresh the web page. The new business unit appears in the Business Unit column in Advanced Search Results.
Send to [Referral Company]*
You can assign assignments to a referral company. For more information, see Referral Assignment. This option is not available for read-only users.
- Select the check boxes for the assignments you want to refer.
- Click the Select an Action menu and select Send to [Referral Company].
- Click Go. A dialogue box appears with the referral recipient and assignment IDs listed.
- Click Send Referrals.
- When each referral has been sent, the assignment IDs change to green text and you are notified that the referral was successful. You are notified when XactAnalysis is done sending the selected referral assignments.
- Click Close.
Assign Surveyor*
This option appears if your company uses surveyors. It allows you to select a surveyor from a list and assign one to the assignment.