Classic Payment Queue
- Access the Payment Queue
- Use Payment Queue actions
- Filter Payment Queue search
- Administrator Roles
- Processor Roles
- Apply this rule to
- With a XactAnalysis status of
- Hierarchy Type
- Area
- Desk Adjuster
- For this CAT Code
- For this Claim #
- For this State(s)
- For this Policy Type
- For this Coverage Type
- For this Business Unit
- For this Type of Loss
- For this Postal Code
- For date range between
- 1 of every (randomly)
- Percentage to add to queue
- Number of estimates
- For estimate value between
- Job Type
- Overhead & Profit
- Estimate Contains
- Number of trades are
- Selected trades
- Contains pricelist category
- Activity Diary Report Uploads
- Test Assignments
The Payment Queue is a module that gathers all of the estimates submitted for payment and lists them for desk review. You can send individual estimates to the queue manually, or you can set up rules that add estimates according to specified criteria. When an estimate is in the queue, administrators assign the estimates out to processors who update their statuses and manage payments.
The screen shots in this document are generic, and your company’s interface may vary.
Access the Payment Queue
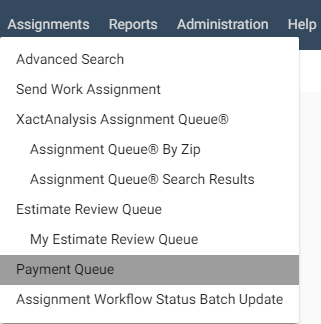
- Select Payment Queue from the Assignments menu.
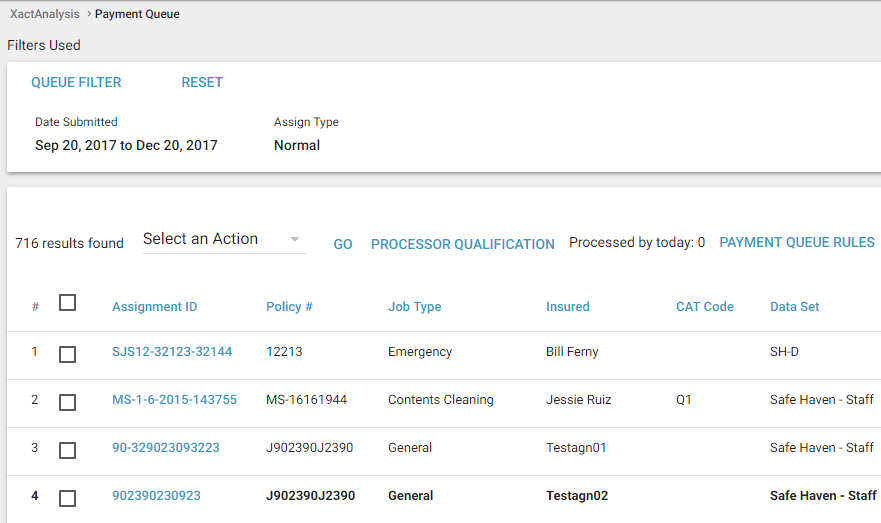
The Payment Queue displays a list of estimates. Users with Payment Processor rights only see estimates assigned to them. Users with Payment Admin rights however, see all estimates regardless of the assigned processor.
- Sort columns alphabetically by selecting a heading title.
- To reset your Queue Filter after sorting columns, select reset near the top-left corner of the page.
Use Payment Queue actions
You can complete actions for selected estimates in the Payment Queue. You can assign or unassign them, add notes to them, export them to a spreadsheet, or mark them as read, unread, or QA approved.
- Select the check boxes for the appropriate estimates.
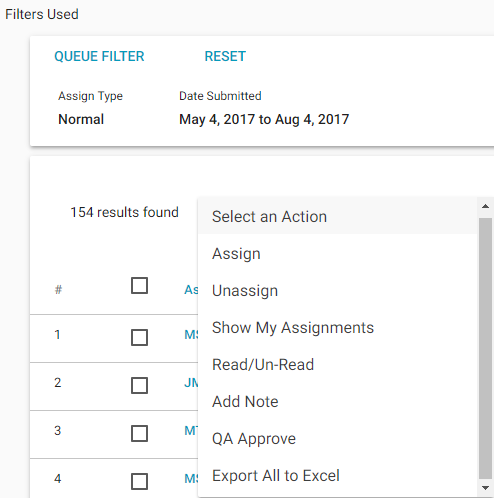
- Select an action from the Select an Action menu.
Assign
This option allows you to assign selected estimates to a qualified processor from the Select a Processor menu that appears. This option is only available with Payment Administrator rights.
Unassign
This option allows you to unassign processors from selected estimates. This option is only available with Payment Administrator rights.
Show my Assignments
This option filters the list to display only estimates assigned to you. This option is only available if you have both Payment Administrator and Payment Processor rights.
Read/Un-Read
This option switches selected estimates between Read (non-bold) and Un-Read (bold).
Add Note
This option allows you to add a note to the Details page of selected estimates.
QA Approve
This option allows you to mark selected assignments as QA Approved.
Export All to Excel
This option allows you to export all of the estimates in the queue to an Excel® spreadsheet.
- Click Go.
Filter Payment Queue search
The Payment Queue can be filtered to display only estimates that meet your specified criteria. You can filter by insured, claim number, recipient, processor, or even by estimate status or date.
- To apply a filter, click Queue Filter in the top left corner of the page. The filter dialog box appears.
- Set your criteria and click Search.
The Payment Queue now only shows estimates that fit the parameters of your filter.
- Additionally, if you have both Payment Administrator and Payment Processor rights, you can select Show my Assignments from the Select an Action menu on the Payment Queue page to display only estimates that are assigned to you.
Administrator Roles
Those with the Payment Administrator right are able to view all of the estimates in the Payment Queue as well as qualify and assign estimates to processors for updating.
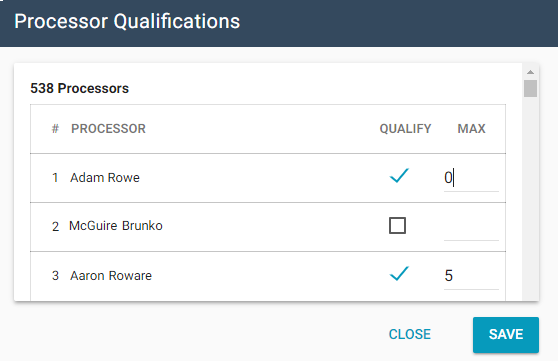
Qualify payment processors
In order for a processor to be able to update estimates, they must first be qualified by an administrator.
- Click Processor Qualification, located above the queue list.
- In the dialog box that appears, select the check box for each processor you want to qualify. If you want to set a limit for the maximum number of estimates the processor may have in their queue at one time, type that number in their Max column. Otherwise, the processor may have an unlimited number of estimates in their queue.
- Click Save.
Assign payment processors
You can assign an estimate from the Payment Queue to a processor.
- Select the check box for each estimate you want to assign.
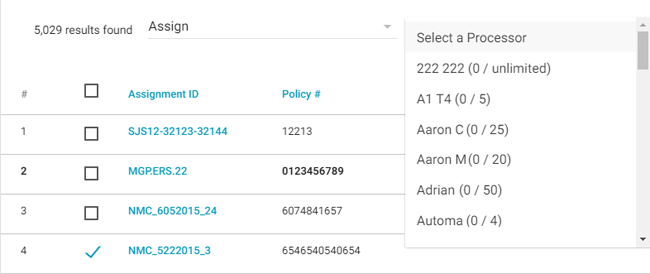
- Select Assign from the Select an Action menu.
- Select the name of a qualified processor from the Select a Processor menu.
- Click Go.
Processor Roles
Those with the Payment Processor right are able to either reject assignments or update their payment status.
Update estimates as Paid
- Click the claim number of an estimate in your Payment Queue.
- On the Details page, click Update in the Paid Status section.
- In the Update Status dialog box that appears, select one of the first two options in the New Status section:
Paid
Select this radio button if payment for the insured was processed. You can select the Partial check box to signify a balance remains on the amount, or the Paid as Expense check box to show the paid amount is an expense for reporting or accounting purposes.
Paid on Site
Select this radio button if the insured was paid by the adjuster or contractor on site. You can select the additional Pay Vendor Invoice Only check box if the insured was only paid the exact amount on the vendor invoice.
Submit for Payment
Select this radio button if you recommend that the paying company pay an amount (indicated by the check boxes underneath) towards the claim.
Not Paid
Select this radio button if, for any reason, the insured was not paid. You can also select the Customer Responsible for Invoice check box if the customer is responsible for the invoice.
Amount Paid
Enter the amount of the balance that was paid to the insured.
Amount Not Paid
Enter the amount of the balance that was not paid to the insured.
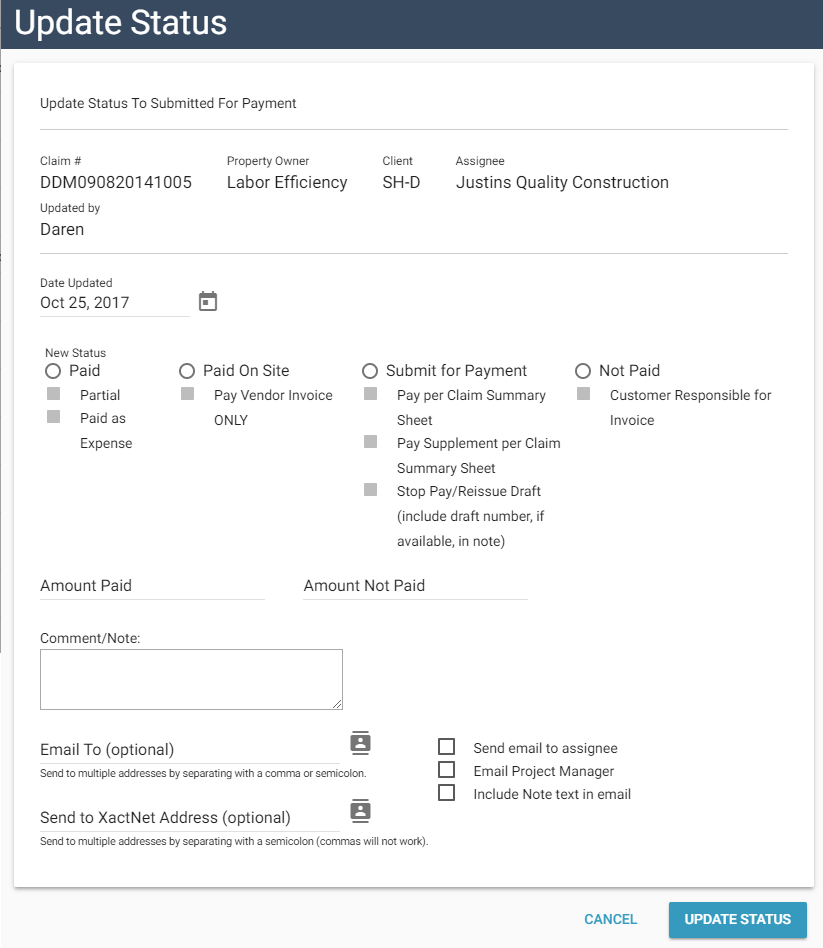
- If you want to add any comments or notifications, you can do so with the remaining fields and check boxes. When you are finished, click Update Status.
After estimates are updated to Paid or Paid on Site, they are automatically removed from the Payment Queue.
Reject payment assignment
If for any reason you need to reject a payment assignment, click the estimate’s claim number in the Payment Queue, then click the Select an Action menu on the Assignment Detail page, and select Reject Payment Assignment. This removes the estimate from your queue and allows an administrator to assign it to another processor.
Send estimates to the Payment Queue
There are two ways to send estimates to the Payment Queue: manually or through automatic rules.
Send estimates manually
- From the Assignment Detail page of any estimate not already in the Payment Queue, click Add to Queue in the Paid Status section.
- In the Update Status dialog box that appears, select the Submit for Payment radio button.
- Select any additional check boxes below if they apply.
- If you want to send any notes or notifications, you can do so with the remaining fields and check boxes. When you are finished, click Update Status.
Set up Payment Queue rules
You must have Payment Administrator rights to access the Payment Queue rules.
- Select Payment Queue from the Assignments menu. Then click the Payment Queue Rules link on the Payment Queue page.
The Payment Queue Rules page displays all of the Payment Queue rules for your company.

- To create a new rule, click Add New Rule. In the dialog box that appears, enter a name for the rule and select the conditions that determine which estimates are sent to the queue. When you’re done, click OK. For more information about the fields and menus in this dialog box, see Add Queue Rules fields and menus.
- To create a new rule that is similar to an existing one, click Copy in the second to last column of the existing rule. This brings up a dialog box with all of the settings for the existing rule. Make any necessary changes and then click OK to save your settings in a new rule.
- To delete a rule, click delete in the last column of the rule.
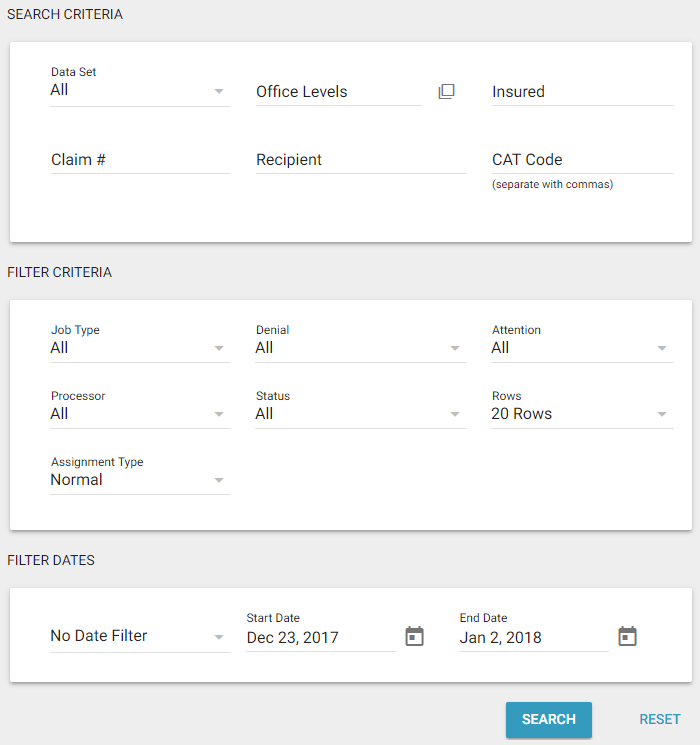
Add Queue Rules fields and menus
Data Set(s)
Select one or more data sets to allow estimates from those data sets to enter the queue.
Rule Name / Description
Enter the name or description of your rule.
Rule Priority
Select a priority for your rule: None, 1 (First Group Processed), or 2 (Second Group Processed). The rules filter estimates based on priority. XactAnalysis will filter all the estimates with the first priority rule, and then filter the remaining estimates based on the second priority rule.
All Required
(All of the selected conditions must be met to send an assignment to the review queue.)
Apply this rule to
Select to apply the rule to future or existing estimates
With a XactAnalysis status of
Select a status or leave it as (All). See Statuses for status definitions. If you select Canceled or Client Approved, you can also filter by how that status is set (Automatically, Manually, or Either).
Hierarchy Type
Select a hierarchy type: Geographic, Organizational, or Individual.
Area
Select an area for the rule. Leave it as (All) to allow assignments from all data set (program) areas into the review queue.
Desk Adjuster
Select a desk adjuster. Leave this field blank to allow estimates with any desk adjuster into the queue.
For this CAT Code
Enter a CAT Code into the auto-complete field and select from the list. To enter more than one CAT Code, separate them by commas. Leave this field blank to allow estimates with any CAT code into the review queue.
For this Claim #
Enter a claim number. Leave this field blank to allow any claim number into the review queue.
For this State(s)
Select one or more states from the drop-down menu. Leave this field blank to allow estimates from any state to enter the queue.
For this Policy Type
Select a policy type from the drop-down menu. Select (All) to allow estimates with any policy type to enter the queue.
For this Coverage Type
Select a coverage type from the drop-down menu. Select (All) to allow estimates with any coverage type to enter the queue.
For this Business Unit
Select a business unit from the drop-down menu. Select (All) to allow estimates with any business unit into the review queue.
For this Type of Loss
Select one or more types of loss from the menu. Select (All) to allow estimates with any type of loss into the review queue.
For this Postal Code
Enter one or more postal codes (separated by commas). Leave this field blank to allow all estimates from all postal codes into the review queue.
For date range between
Select a date range or select Monthly, Quarterly, or Annually from the drop-down menu. The rule will be applied only to estimates within the specified range or it will be applied monthly, quarterly, or annually only. Leave these fields blank if you do not wish to apply a date range to the rule.
1 of every (randomly)
Enter a number to set up random reviews for 1 of every [number] estimates.
Percentage to add to queue
Enter a percentage of claims to randomly be added to the queue.
Number of estimates
Enter a number of estimates to send to the review queue. Select the per adjuster/contractor check box to send a specific number of estimates based on the number of adjusters and contractors you have set up to review assignments.
For estimate value between
Enter a value range.
Job Type
Select a job type.
Overhead & Profit
Select whether to include estimates with O&P or No O&P. Select No Selection for neither.
Estimate Contains
Select whether or not to include O&P as part of your rule.
Number of trades are
Select whether or not to include estimates with greater than or less than a certain number of trades, or select No Selection for neither. Enter the greater than or less than amount in the provided field.
Selected trades
Select a trade.
Contains pricelist category
Select a country, then select a pricelist category from the drop-down menu.
Activity Diary Report Uploads
Select the check box to exclude activity diary report uploads.
Test Assignments
Select the check box to include test assignments. Leave cleared to exclude test assignments.
One Required
(This section appears when you select Apply this rule to only future estimates in the All Required section.)
Audit Results
Select Any to send estimates with any audit results into the queue. Select Corrected to send estimates in which audit violations have been corrected into the queue. Select Not Corrected to send estimates in which audit violations were not corrected into the queue. Select Specific and one or more audit results from the list that appears.
Audit Violation Count
Enter a number. All estimates with that number of violations are sent to the review queue. Select the Greater than check box to send estimates with violations totaling more than the entered number to the review queue.
Category
Selector Codes within Estimate Include: Select the check boxes to include estimates with specific selector codes in the review queue.
Line Item Quality
Select the check boxes to include estimates with specific line item qualities in the review queue.
Price List
Select the Deviations check box to send estimates with price list deviations into the review queue. For Price Only Deviations, you can choose to identify estimates by the number of items with deviations or the deviation amount.
Pricing Variations
Select the check box to send estimates with pricing variations into the review queue.
Line Items
You can send estimates into the queue that have line items with very specific details.
- Use the All Required feature to identify estimates with all the line items you enter here.
- Use the One Required feature to identify estimates with at least one of the line items you enter here.
You do not need to enter information into each menu and box. For example, you could use only the Category menu, sending estimates to the queue that have line items from a specific category.
- Select a Country.
- Select the Category for this line item. The Activity box will automatically be filled in.
- Choose a Selector.
- Choose whether the rule will look for a line item with a specific amount (equal to the number you enter) or a line item with more or less than a specific amount.
- Choose whether the rule will look for items at the line item level or the estimate level. Line item level rules will look for a single item that matches the criteria. Estimate level rules will look for a total of line items that match the criteria.
- Select whether the rule will look for corrected line items, not corrected, or neither.
To add more line item identifiers, click Add. To remove an identifier, click Delete.
Third Party
Filter Option
Select the check box to include only estimates that contain items in the fields section below.
MoistureScore™
Choose whether to include estimates with total scores greater than or less than a given value, or between two given values.
MoistureScore™ Sublevel
Choose whether to include estimates with Key Process Indicators, Mitigation Process Management, or Response Time Management scores that are greater than or less than a given value, or between two given values.
Other
Client Approval
Select Manual to allow client reviewers to manually review and approve the estimates in the queue. Select Auto Approve to automatically approve the estimates in the queue based on the criteria of the rule.
Email To
Enter one or more email addresses (separated by commas). XactAnalysis sends an email to the specified addresses when an estimate triggers this rule and is sent to the Estimate Review Queue.
Automatically assign to
Enter the name of a reviewer to be specifically assigned or select (All). Estimates sent to the queue by this rule can be automatically assigned a reviewer that you specify here.