Program Rule Notifications
The Program Rules module allows you to set up notifications to inform you of issues with service providers and internal programs. In the Assignment Escalation tab, you set up notifications for assignment escalation issues; and in Notification Setup, you determine exactly who should be notified regarding these issues. You can set up multiple employees to be notified for any location, and you can set up any employee to receive notifications for multiple locations.
When working with program rules, remember that the assignor is the creator of the assignment (the insurance carrier, in most cases), and the assignee is the recipient of the assignment (the service provider).
The screen shots in this document are generic, and your company’s interface may vary.
Related: Personal Rules, FAQ > Administration Questions, Getting Started
Access Program Rules
- Select Program Rules from the Administration menu.
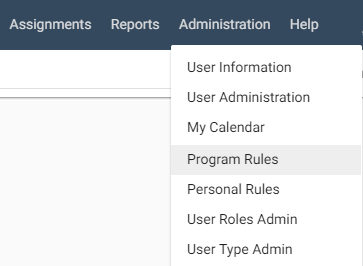
The Program Rules page appears.
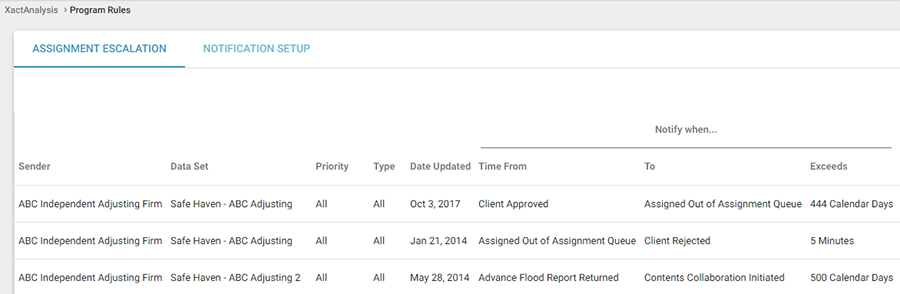
Assignment Escalation
Assignment Escalation helps you handle assignments that are not promptly taken care of by the selected service provider. If this situation occurs, you can set up XactAnalysis to notify you, rotate the assignment to the next service provider, or both. Assignment Escalation simply allows XactAnalysis to escalate an assignment to the next service provider or back to you.
- Click the Assignment Escalation tab on the Program Rules page.
From here you can add, edit, and delete rules regarding assignment escalation.
- To delete a rule, click the Delete icon next to the rule you wish to delete. Your rule is removed from the Assignment Escalation page.
- To edit a rule, click the Edit icon next to the rule you wish to edit. Change the form criteria and click OK.
Add a new rule
- Click Add new rule at the top of the page. The Add Escalation Rule dialog box appears.
- Complete the form as follows:
AUTOMATED ALERT
Data Set
Select the data set for which you want the rule to apply.
Priority
Select the assignment priority for which you want the rule to apply: All, Emergency, or Normal.
Type
Select the type of assignment for which you want the rule to apply: All, Catastrophe, or Non-Catastrophe.
Business Unit
Select a business unit for which you want the rule to apply. Business units vary from company to company.
When elapsed time between, and
Select two events for which you want actions taken if the elapsed time between them exceeds the time limit you specify. See Statuses for event definitions.
Exceeds
Specify an amount of time in calendar or business days, hours, and minutes.
Then take the following action
Select the check boxes for the actions that should occur after the specified time elapses:
-
Notify us
This option sends email notifications to the people you specify in Notification Setup.
-
Notify assignee
This option sends an email notification to the assignee. It also automatically creates an action item in the assignment.
-
Notify the following email addresses
This option enables the Email Addresses field and allows you to enter multiple addresses separated by commas.
-
Notify users in the Notification Center
This option sends notifications within XactAnalysis via the Notification Center.
-
Send reminder to assignee every 30 days
This option sends a reminder email to the assignee every 30 days.
-
Remove Assignment from Review Queue
This option removes the assignment from the Review Queue after the specified time elapses.
-
Mark assignment as Reviewed
This option automatically marks assignments as Reviewed if they exceed a specified limit. When this check box is selected, you can also select a Notify assignee of review completion check box to notify the assignee when the rule is triggered.
-
Cancel Assignment
This option cancels the assignment after the specified time elapses.
Notify the following email addresses
If you selected this check box, type in the email addresses where you want XactAnalysis notifications to be sent. Separate multiple addresses with a comma or semi-colon. Click the Personal Address Book icon to select addresses from your personal address book.
Desk Adjuster
If the time elapses between your two events, and the desk adjuster you specify here is assigned, then the notification is sent. Click the SmartList button to search for a name.
HIERARCHY LOCATION
Hierarchy Type
Select the hierarchy type for the assignments to which you want the rule to apply: Geographic, Organizational, Individual, or Custom Group.
Area
Appears when the Geographic hierarchy type is selected. Click the SmartList button to select an area.
Org Levels
Appears when the Organizational hierarchy type is selected. Click the SmartList button to select an Organizational Level.
Adjuster/Contractor
Appears when the Individual hierarchy type is selected. To select the adjuster or contractor for whom you want the rule to apply, start typing their name or XactNet address and select from the list that appears.
- When you have completed the form, click OK. Your new rule appears in the Assignment Escalation page.
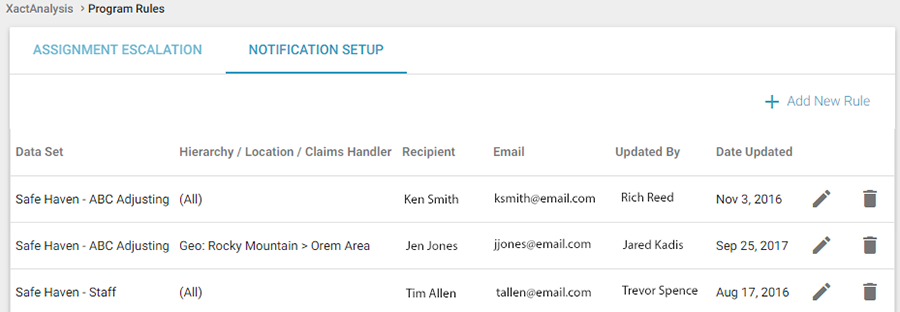
Notification Setup
In Notification Setup, you determine exactly who should be notified regarding assignment escalation issues. Notification is handled by location; i.e., notifications for all service providers in a specific location go to the employee you set up to handle these notifications. You can set up multiple employees to be notified for any location, and you can set up any employee to receive notifications for multiple locations.
- To access, click the Notification Setup tab in the Program Rules page. The Notification Setup page appears.
- To delete a rule, click the Delete icon next to the rule you wish to delete. Your rule is removed from the Assignment Escalation page.
- To edit a rule, click the Edit icon next to the rule you wish to edit. Change the form criteria and click OK.
Add a rule
- Click Add new rule. The Add Notification Rule dialog box appears.
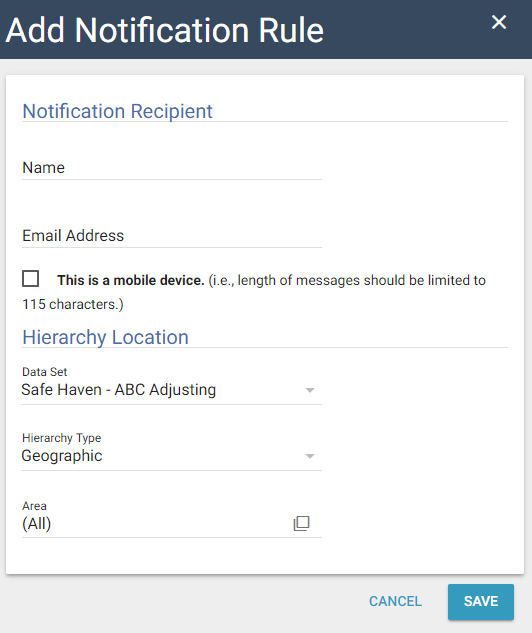
- Complete the Add Notification Rule form as follows:
NOTIFICATION RECIPIENT
Name
Enter the recipient’s name.
Email Address
Enter the recipient’s email address.
This is a mobile device
Select this check box to send the recipient notifications by text message.
HIERARCHY LOCATION
Sender
Select the sender of the notification.
Data Set
Select a data set.
Hierarchy Type
Select a hierarchy type.
Area
Appears when the Geographic hierarchy type is selected. Click the SmartList button to select one or more areas. The recipient will be notified of escalated assignment issues in the areas you select.
Org Levels
Appears when the Organizational hierarchy type is selected. Use the SmartList button to select organizational levels.
Adjuster/Contractor
Appears when the Individual hierarchy type is selected. Start typing the name or XactNet address of an adjuster or contractor and a list appears for you to select from. The recipient will be notified of escalated assignment issues regarding the named adjuster or contractor.
- When you have completed the Add Notification Rule form, click OK. Your new rule appears in the Notification Setup page.